

In this article we will go through how to setup an app with StackNavigator, DrawerNavigator, TabNavigator and how to navigate using it.
First we'll start with initiatiating the App and installing dependencies:
$ react-native init tutorial && cd tutorial
$ yarn add react-navigation
We'll create a folder src/ where all our App logic will be located.
Inside we'll create a screens/ folder where we'll hold all our screens, then static/. In here we'll add our navigation structure in the router.js file. So let's create 6 files in the screen/ folder, named firstScreen.js, secondScreen.js,... sixthScreen.js, that will have nearly identical code but with minor changes.
This is the definition of our screens:
firstScreen.js
import React, {Component} from 'react';
import {View, Text, StyleSheet} from 'react-native';
export default class FirstScreen extends Component {
  render() {
    return (
      <view style="{styles.container}">
        <text color:="" style="{{">Screen 1</text>
      </view>
    );
  }
}
const styles = StyleSheet.create({
  container: { flex: 1, alignItems: 'center', justifyContent: 'center', backgroundColor: '#222' }
});
for all other screens we should change lines:
 export default class FirstScreen extends Component {
   where we'll change FirstScreen to the screen we are adding: FirstScreen, SecondScreen,... SixthScreen
}
Screen 1: here we will change number 1-6
You can change those values as you like, this is just to differentiate between different screens when navigating. You can change backgroundColor at line 21, to a different color for each screen.
Now that we have our screens, let's create our App navigation. DrawerNavigator which will have StackNavigator, with two screens, and TabNavigator. This TabNavigator will have TabNavigator inside. With this structure we can explore basic navigation between screens, showing/hiding drawer on screens, how tabs work .
First we create top most TabNavigator, or TabNavigator inside TabNavigator, we'll call it SecondaryTabs, and will get screens five and six. Tabs will be on top of screen and drawer will not show on those pages.
router.js
import React from 'react';
import { StackNavigator, DrawerNavigator, TabNavigator } from 'react-navigation';
import { NavigationActions } from 'react-navigation';
import FirstScreen from './../screens/firstScreen';
import SecondScreen from './../screens/secondScreen';
import ThirdScreen from './../screens/thirdScreen';
import FourthScreen from './../screens/fourthScreen';
import FifthScreen from './../screens/fifthScreen';
import SixthScreen from './../screens/sixthScreen';
const SecondaryTabs = TabNavigator({
 ScreenFive: { screen: FifthScreen, navigationOptions: { tabBarLabel: 'Screen 5', } },
 ScreenSix: { screen: SixthScreen, navigationOptions: { tabBarLabel: 'Screen 6', } }
 },
 { tabBarPosition: 'top', });
Next we create a Primary Tabnavigator, that will have pages 3, 4 and 5, 6 in secondary TabNavigator, tabs will be on the bottom.
router.js
const primaryTabs = TabNavigator(
  {
    screenThree: {
      screen: thirdScreen,
      navigationOptions: {
        tabBarLabel: 'Screen 3',
      },
    },
    secondaryTabs: {
      screen: secondaryTabs,
      navigationOptions: {
        tabBarLabel: 'Screens 5/6',
        header: null,
      },
    },
    screenFour: {
      screen: fourthScreen,
      navigationOptions: {
        tabBarLabel: 'Screen 4',
      },
    },
  },
  {
    tabBarPosition: 'bottom',
  }
);
Now we'll create a Drawer. Because we want header header in our TabNavigator without having to create and add a header component to each screen of the TabNavigator, we'll incase it in StackNavigator. Drawer will have another StackNavigator where we'll add screens 1 and 2 with mutual navigation separately from TabNavigator.
router.js
const overAllNavigation = DrawerNavigator(
  {
    screenTab: {
      screen: StackNavigator(
        {
          Tabs: {
            screen: primaryTabs,
            navigationOptions: ({ navigation }) => ({
              title: 'Example App',
              headerLeft: {
                navigation.navigate('DrawerToggle'),
              },
            }),
          },
        },
        {
          navigationOptions: ({ navigation }) => ({
            title: 'Screen 1/2',
          }),
        }
      ),
    },
    screenStack: {
      screen: StackNavigator({
        screenOne: {
          screen: firstScreen,
          navigationOptions: ({ navigation }) => ({
            title: 'Screen 1',
            headerLeft: {
              navigation.navigate('DrawerToggle'),
            },
            headerRight: {
              navigation.navigate('screenTwo'),
            },
          }),
        },
        screenTwo: {
          screen: secondScreen,
          navigationOptions: ({ navigation }) => ({
            title: 'Screen 2',
            headerLeft: {
              navigation.goBack(),
            },
          }),
        },
      }),
    },
  },
  {
    gesturesEnabled: false,
    drawerWidth: 240,
  }
);

export default overAllNavigation;
The last thing is to change the index.js so this navigation is the main component of the App.
router.js
import { AppRegistry } from 'react-native';
import App from './src/static/router';

AppRegistry.registerComponent('tutorial', () => App);
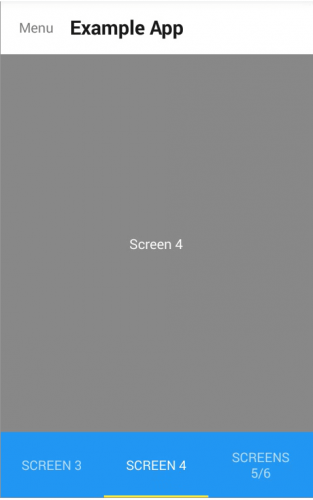
Example preview:
Similar content can be found on: Cordova vs React Native